
The cost of a bad setup
I remember one gig, years ago, where my vintage Strat just fought me the whole night. The strings felt like they were miles from the fretboard, chords were a struggle, and even simple bends sounded off. I spent more energy wrestling with the guitar than actually playing. It turned out the setup was completely out of whack. That experience taught me a valuable lesson: a perfectly tuned guitar is useless if it’s not properly set up.
A good guitar setup isn't just about getting the strings to the right pitch; it’s about optimizing playability, maximizing tone, and even extending the life of your instrument. Correct neck relief, action, and intonation make a world of difference in how comfortable a guitar is to play, how clearly it rings, and how well it stays in tune. It impacts everything from effortless chord changes to singing lead lines.
This guide won't help with a cracked neck or a snapped truss rod. Those need a luthier. But you can handle the routine tweaks that keep a guitar playable at home. It saves money and helps you understand how your instrument actually works.
We’ll focus on the regular adjustments that a guitarist can perform to maintain optimal playability. This isn't about fixing broken guitars; it's about keeping a good guitar playing well and avoiding frequent trips to the shop. Think of it as preventative care, like changing the oil in your car.
The basic toolkit
You don't need a fully equipped workshop to perform basic guitar maintenance. Many folks think you need a ton of specialized tools, but that's just not true. A few essential items will cover most adjustments. Overbuying can be intimidating and unnecessary.
Here's what I recommend: a good set of screwdrivers (both Phillips head and flathead), a string winder to speed up string changes, wire cutters for trimming strings, and a set of feeler gauges for accurately measuring string action. A capo is also incredibly useful for checking neck relief. You can find decent sets of these tools for around $30-$50 online.
A neck relief gauge is helpful, but you can get by with a straight edge (a metal ruler works well) and a business card as a temporary substitute for checking the gap under the strings. Don’t feel you need to spend a fortune on fancy tools to start. A clean, well-lit workspace is arguably just as important as the tools themselves.
- Phillips head and flathead screwdrivers
- String winder
- Wire cutters
- Feeler gauges
- Capo
- Straight edge (metal ruler)
- A business card for measuring gaps
Essential Setup Tools
- String Winder/Cutter - Quickly and efficiently changes strings. Many include a built-in bridge pin puller for acoustic guitars.
- Electronic Tuner - Accurate tuning is the foundation of a good setup. Consider a clip-on or pedal tuner.
- Multi-Tool Set (Hex/Allen Wrenches) - For adjusting truss rods, saddles, and other hardware. A set with metric and imperial sizes is ideal.
- Screwdrivers (Phillips & Flathead) - Needed for pickup height adjustments, control cavity access, and general hardware tightening. Precision screwdrivers are recommended.
- String Action Gauge - Measures the height of the strings above the frets, crucial for setting comfortable action.
- Nut Files - For slotting the nut to the correct depth and width for optimal string spacing and playability. Requires practice and care.
- Fret Rocker - Helps identify high frets that may be causing buzzing. A valuable tool for diagnosing neck issues.
- Lemon Oil/Fretboard Conditioner - Keeps your fretboard hydrated and prevents cracking. Use sparingly.
Setting neck relief
Neck relief refers to the slight bow in the guitar neck. It’s not a flaw; it’s a deliberate design feature. The tension of the strings pulls on the neck, and a small amount of forward bow is necessary to allow the strings to vibrate freely without buzzing against the frets. Too much bow, and the action becomes high and difficult to play. Too little, and you get buzzing.
To check neck relief, fret the first and last frets simultaneously. Then, look at the gap between the bottom of the strings and the 7th or 8th fret. You should see a very slight gap – about the thickness of a business card. A feeler gauge can give you a more precise measurement; a typical starting point is around .010 inches.
Adjust the relief by turning the truss rod. Clockwise tightening reduces the bow; counterclockwise loosening increases it. Move in quarter-turns. If you feel heavy resistance, stop immediately to avoid stripping the nut or snapping the rod.
Over-tightening the truss rod can cause serious damage to the neck, so proceed slowly and carefully. Always stop if you feel resistance. Remember that neck relief can change with seasonal variations in temperature and humidity, so you may need to make minor adjustments throughout the year. If you’re uncomfortable with this process, it's best to consult a professional.
- Fret the first and last frets.
- Observe the gap between the strings and the 7th/8th fret.
- Adjust the truss rod in quarter-turn increments.
- Re-check the relief after each adjustment.
Adjusting string action
String action refers to the height of the strings above the frets. It's a crucial factor in playability. Low action makes the guitar easier to play, requiring less force to fret notes. However, excessively low action can lead to string buzzing, especially on lower frets. Higher action reduces buzzing but makes the guitar harder to play, particularly for beginners.
To measure string action, use a feeler gauge to measure the distance between the bottom of the string and the top of the 12th fret. A common starting point for electric guitars is around .065 inches for the high E string and .080 inches for the low E string. Acoustic guitars typically have slightly higher action, around .085/.100 inches. These are starting points, though. Personal preference plays a huge role.
Adjusting string action involves raising or lowering the bridge saddles. Most guitars have adjustable saddles that can be raised or lowered using small screws. Turning the screw clockwise raises the saddle, increasing the action, and turning it counterclockwise lowers the saddle, decreasing the action. Again, small adjustments are best.
There's a trade-off to consider. Lower action is great for fast playing and bending, but it can sacrifice some tone and clarity. Higher action provides a fuller tone but requires more finger strength. Experiment to find the sweet spot that suits your playing style. Different guitars will also have different optimal action heights based on their construction and intended use. A guitar built for slide playing, for instance, will need higher action than one intended for shredding.
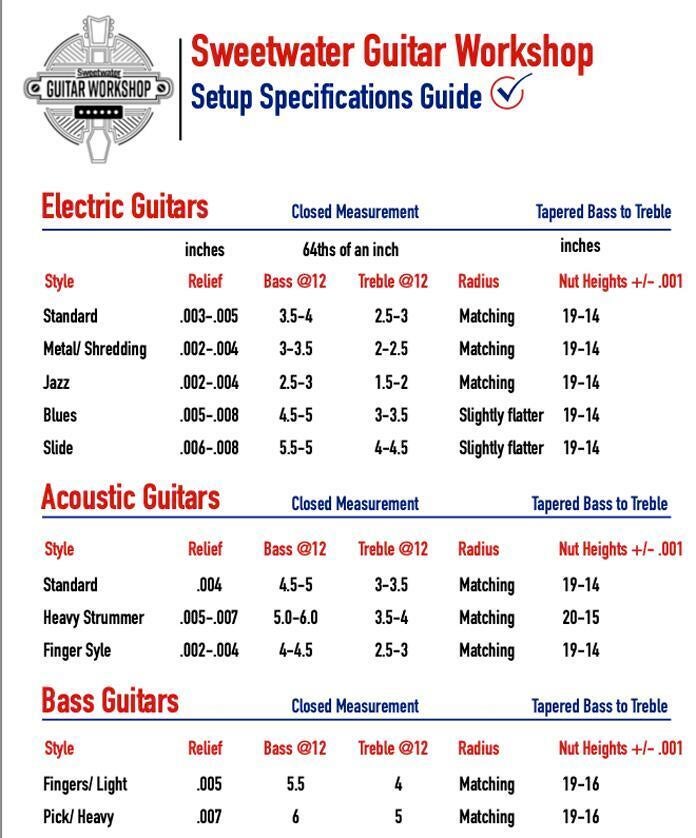
Here’s a general guide for action heights, but remember these are just starting points:
Action Height Guide Electric Guitar: .065” - .080” (High E to Low E) Acoustic Guitar: .085” - .100” (High E to Low E)
Recommended String Action Heights
| Guitar Type | Playing Style | Low E String Action (inches) | Low E String Action (millimeters) |
|---|---|---|---|
| Electric Guitar | Beginner | 8/64 - 10/64 | 3.2 - 3.9 |
| Electric Guitar | Intermediate | 6/64 - 8/64 | 2.4 - 3.2 |
| Electric Guitar | Advanced | 5/64 - 7/64 | 2.0 - 2.8 |
| Acoustic Guitar | Beginner | 10/64 - 12/64 | 3.9 - 4.7 |
| Acoustic Guitar | Intermediate | 8/64 - 10/64 | 3.2 - 3.9 |
| Acoustic Guitar | Advanced | 7/64 - 9/64 | 2.8 - 3.5 |
| Classical Guitar | Beginner | 8/64 - 10/64 | 3.2 - 3.9 |
| Classical Guitar | Intermediate/Advanced | 6/64 - 8/64 | 2.4 - 3.2 |
Illustrative comparison based on the article research brief. Verify current pricing, limits, and product details in the official docs before relying on it.
Intonation: Making It Play In Tune
Intonation refers to the accuracy of pitch as you move up the neck. A properly intonated guitar will play in tune not just at the open strings but also at the 12th fret and beyond. Poor intonation means that chords will sound out-of-tune higher up the neck, even if the open strings are perfectly tuned.
To check intonation, tune the guitar normally. Then, fret the 12th fret of each string and compare the pitch to the open string using a tuner. If the fretted note is sharp, the saddle needs to be moved back (away from the nut). If it’s flat, the saddle needs to be moved forward (toward the nut).
Adjusting intonation involves moving the saddles forward or backward. Most bridges have screws that allow you to adjust the saddle position. Loosen the saddle screw, move the saddle, and then re-tighten the screw. Re-tune the string after each adjustment and re-check the intonation. This process may need to be repeated several times to get it right.
Several factors can throw off intonation. Worn strings, incorrect string gauge, and even a poorly cut nut can all contribute to intonation problems. Make sure you're using fresh strings of the correct gauge for your guitar. If you've recently changed string gauges, you'll almost certainly need to re-intonate the guitar.
Your grip matters here. If you squeeze the strings too hard against the frets, you'll pull the note sharp and get a false reading. Use the same pressure you use when actually playing.
- Tune the guitar.
- Fret the 12th fret of each string.
- Compare the pitch to the open string using a tuner.
- Adjust the saddle position as needed (forward or backward).
Intonation IQ: How Well Do You Understand Your Guitar's Tuning?
Intonation is a critical aspect of a well-set-up guitar, ensuring it plays in tune all the way up the neck. This quick quiz will test your understanding of what intonation is, how to check it, and how to make adjustments. Accurate intonation means a properly tuned guitar at the nut also plays in tune at the 12th fret. Let's see how much you know!
Dialing in pickup height
Pickup height—the distance between the strings and the pickup poles—significantly impacts your guitar’s tone. Closer to the strings generally results in a louder, brighter sound with more output. Further away produces a quieter, warmer tone with less output. It's a subtle adjustment, but it can make a big difference.
Adjusting pickup height involves loosening the screws that hold the pickup in place, raising or lowering it, and then re-tightening the screws. Start with the pickups relatively low and gradually raise them until you achieve the desired tone. Experimentation is key. There's no single 'correct' height.
The optimal pickup height depends on your playing style and the type of music you play. For aggressive rock or metal, you might want the pickups closer to the strings for more output and sustain. For cleaner styles like jazz or blues, you might prefer them further away for a more mellow tone. Different guitar types also benefit from different heights; Stratocasters generally sound best with a slightly lower pickup height than Les Pauls.
This adjustment is more about personal preference than precise measurements. Play your guitar and listen carefully to how the tone changes as you adjust the pickup height. Pay attention to clarity, output, and overall balance.
Nut and Fretboard Care: Extending Guitar Life
The nut, the small piece of material at the headstock, is a critical point of contact for the strings. Keeping it lubricated prevents the strings from binding and causing tuning instability. Graphite lubricant (available as 'nut sauce') is ideal for this purpose. Apply a small amount to the nut slots periodically.
The fretboard also requires regular care. Over time, it can become dry and brittle. Cleaning and conditioning the fretboard with a product like lemon oil helps to keep it hydrated and prevents cracking. Apply a small amount of lemon oil to a clean cloth and rub it into the fretboard, then wipe off any excess. Avoid using harsh chemicals or solvents.
Fret wear is inevitable, but you can slow it down by keeping the fretboard clean and properly lubricated. Eventually, however, the frets will wear down and need to be leveled or replaced by a professional. This is a more complex repair that’s best left to a luthier.
Proper storage is also important. Avoid exposing your guitar to extreme temperatures or humidity. A case is your guitar's best friend. Consider using a humidifier inside the case, especially during dry winter months, to maintain a stable humidity level.
How often do you perform a full guitar setup on your instrument?
Vote below!


No comments yet. Be the first to share your thoughts!