
Understanding the B Chord on Guitar
Hey there, fellow guitar enthusiasts! It's Jesse 'Bluesman' Johnson here, ready to dive into the world of guitar chords with you. Today, we're going to focus on one chord that often gives beginners a bit of a challenge - the B chord. So, let's get started on our journey to mastering the B chord on guitar.
First, let's get to know the B chord a little better. The B Major chord, often simply referred to as the 'B chord', is a staple in countless songs across various genres. It's a vibrant and full-sounding chord that can add depth to your music. However, it's also notorious for being a bit tricky to play, especially for beginners. But don't worry, with the right guidance and plenty of practice, you'll be able to learn the B chord on guitar and incorporate it into your playing with ease.
The B chord is a barre chord, which means you'll need to use one finger to press down multiple strings at the same time. This technique can be a bit challenging if you're new to it, but it's a crucial skill to develop for guitar skills improvement. Barre chords like the B chord open up a whole new world of possibilities on the guitar, allowing you to play a wider range of chords and progressions.
So, how exactly do you play the B chord? Well, we'll get into the specifics of finger placement in the next section. But for now, just know that you'll be using your index finger to bar the second fret, and your other fingers to press down the fourth fret on the D, G, and B strings. It might feel a bit awkward at first, but with practice, you'll get the hang of it.
Remember, mastering guitar chords is a journey, not a race. Take your time, practice regularly, and don't be too hard on yourself. You're learning a new skill, and that's something to be proud of. So, let's continue this journey together and take a step-by-step approach to mastering the B chord on guitar.
Stay tuned for more professional guitar tips and guitar chord tutorials to help you on your path to becoming a better guitarist. Keep on strumming!
Proper Finger Placement for the B Chord
Alright, my guitar-loving friends, it's time to get down to the nitty-gritty of the B chord - the proper finger placement. Now, I want you to remember, this might feel a bit like trying to twist your fingers into a pretzel at first, but stick with it. With time, your fingers will gain the dexterity they need, and this chord will become second nature. So, let's break it down, step by step.
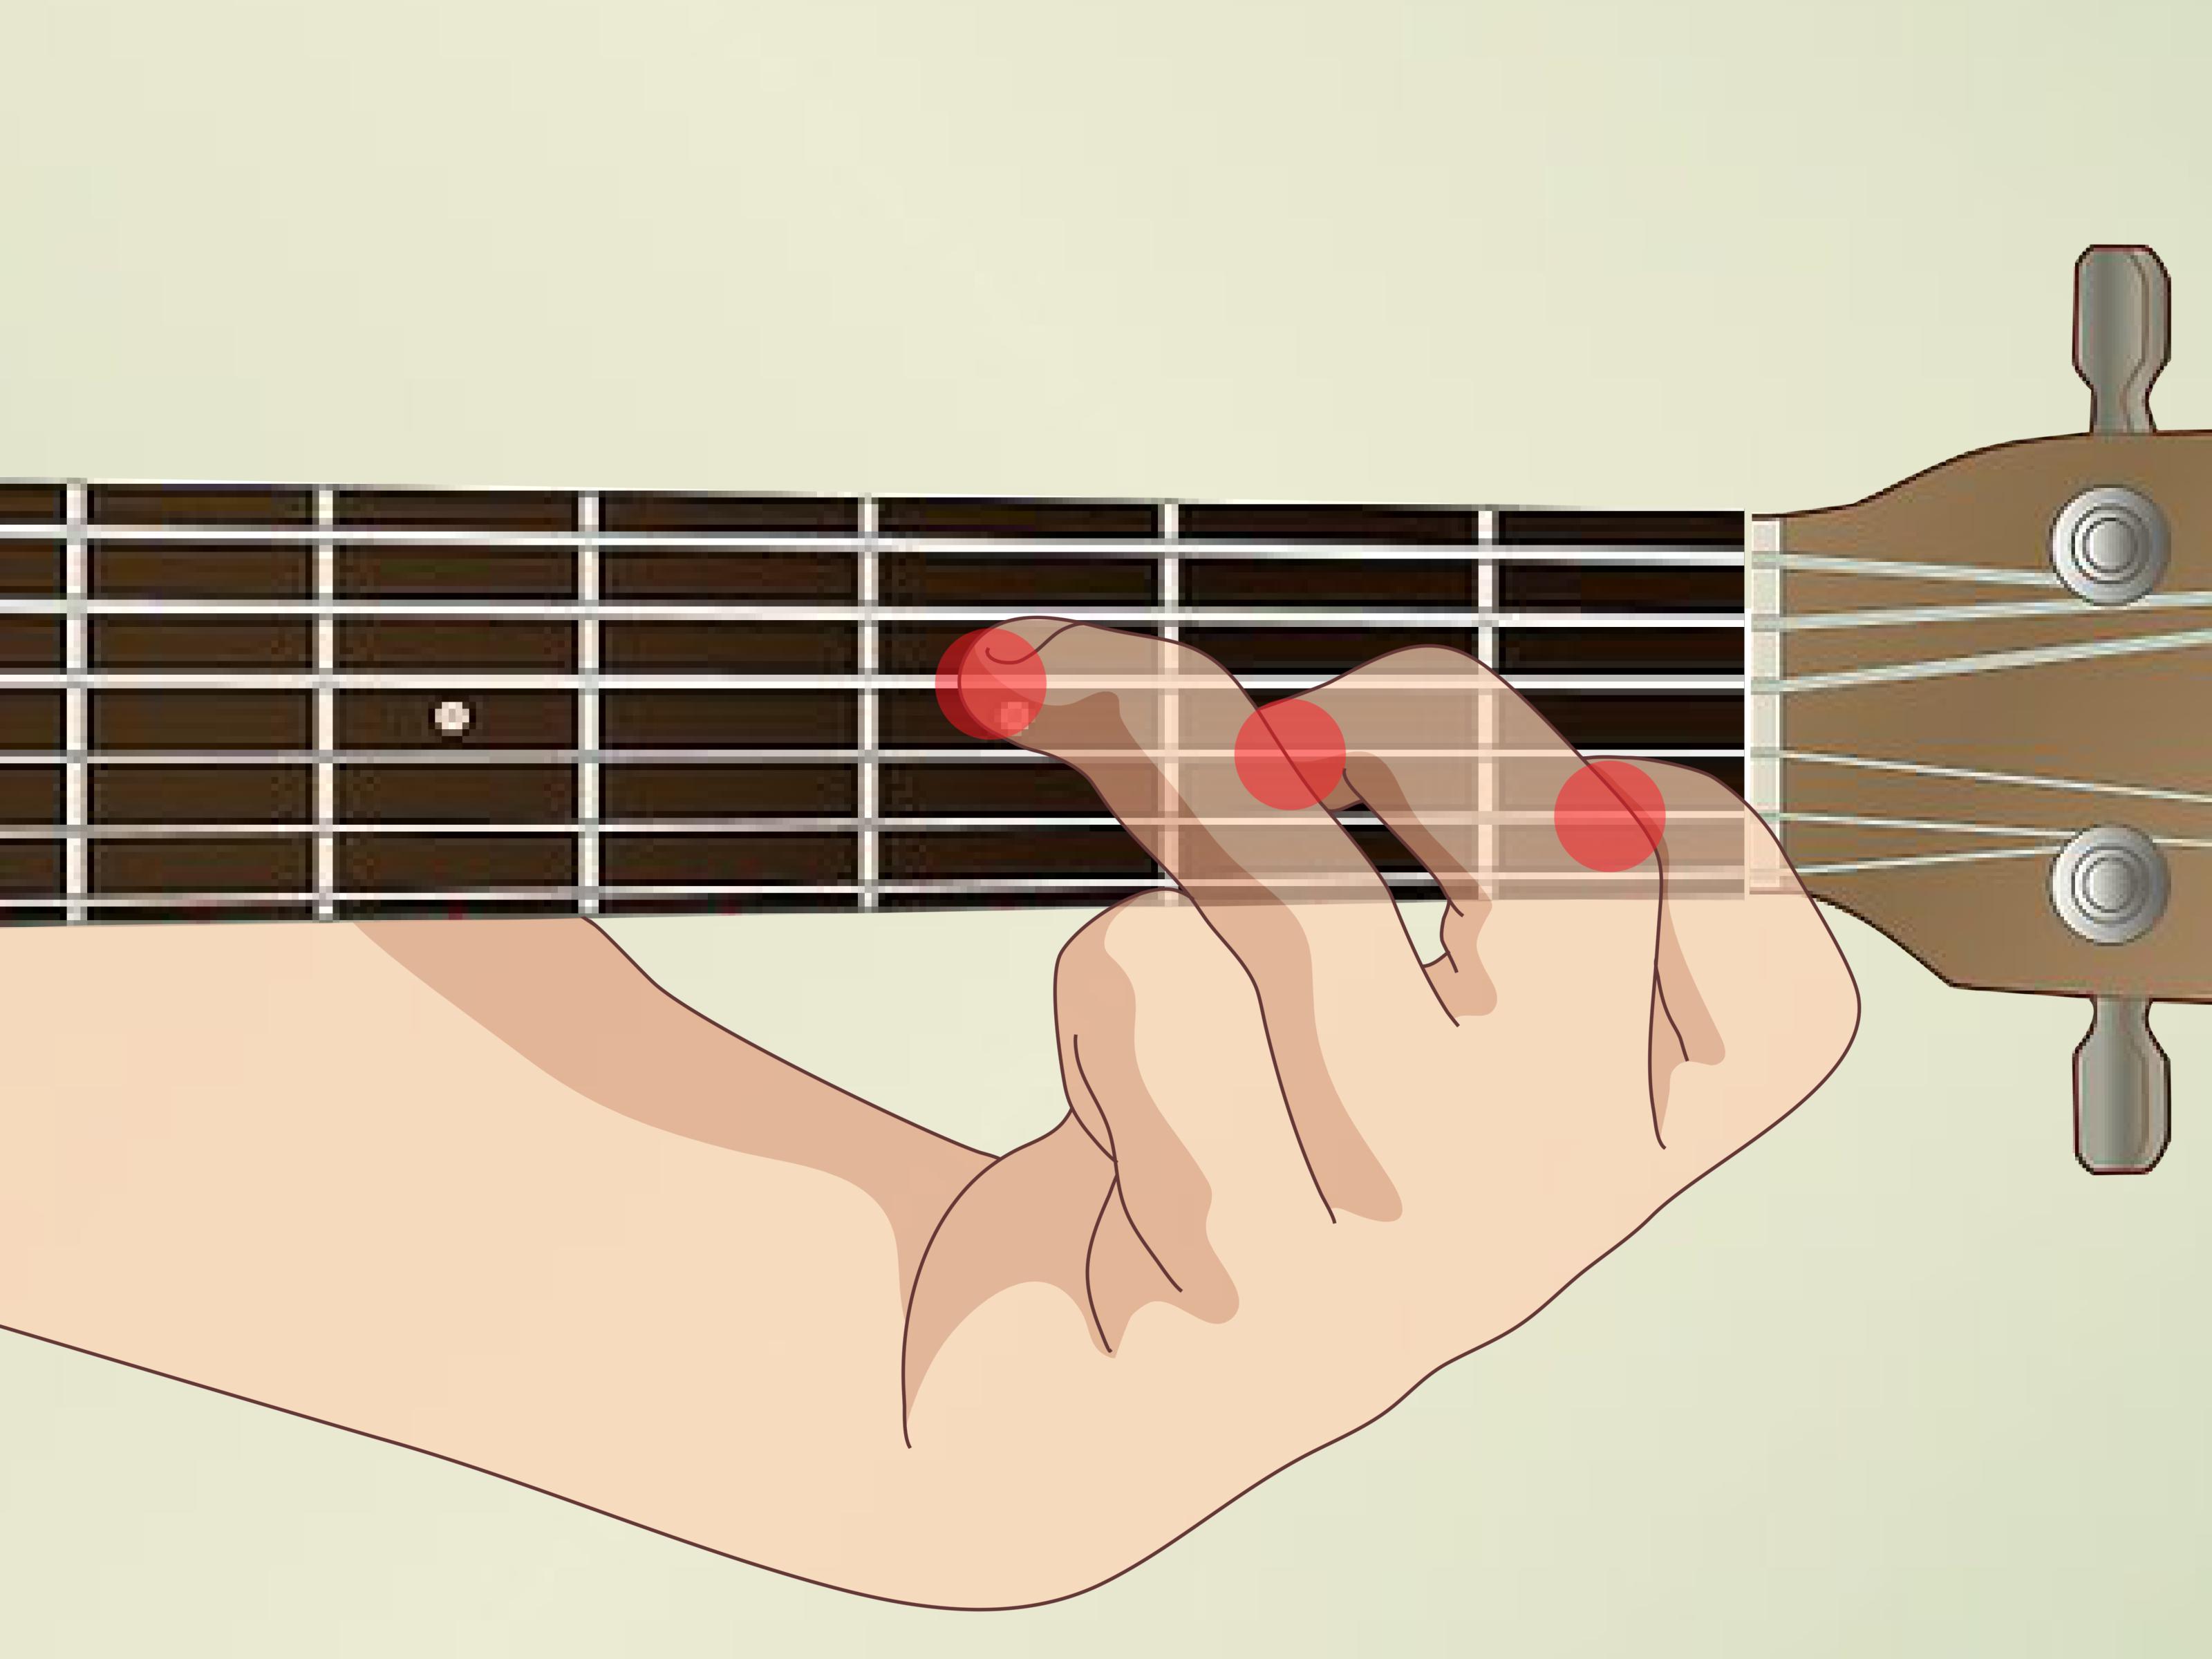
First off, your index finger is going to be doing a lot of the heavy lifting here. You'll need to lay it flat across all the strings on the second fret. This is what we call a 'barre'. It might feel a bit strange at first, but this is a key technique for playing many different chords on the guitar, not just the B chord. 
Next, let's talk about your other fingers. Your middle finger isn't going to be used for this chord, so you can let it rest. Your ring finger, however, has a big job. It needs to press down on the fourth fret of the D (4th) string. Your pinky finger will be right underneath it on the G (3rd) string, also on the fourth fret. Finally, your third finger will be on the B (2nd) string, again on the fourth fret. 
So, to recap, your index finger is barring all the strings on the second fret, and your ring, pinky, and third fingers are pressing down on the fourth fret of the D, G, and B strings respectively. It's a bit of a stretch, I know, but with practice, you'll get there. Remember, the goal here is to get a clear, ringing sound from each string when you strum the chord. If you're hearing any buzzing or muted strings, adjust your fingers until you get it right.
And there you have it - the proper finger placement for the B chord. Keep practicing, and before you know it, you'll be playing this chord like a pro. Stay tuned for more easy B chord techniques and tips to help you on your journey to mastering guitar chords. Keep those fingers nimble, and keep on strumming!
Exercises to Improve Finger Dexterity
Hey there, guitar enthusiasts! It's your ol' pal Jesse 'Bluesman' Johnson here. Now, we're about to dive into a crucial part of mastering the B chord on your guitar - improving your finger dexterity. This ain't just about the B chord, though. These exercises will help you get a grip on any chord you're trying to learn.
First off, let's start with the Spider Exercise. This one's a classic, and for good reason. It's all about getting your fingers to move independently of each other. Start on the low E string (that's the thickest one), and place your fingers on the first four frets. Now, move your fingers one by one to the next string, keeping them on the same frets. Keep going until you reach the high E string (the thinnest one), then go back down again. 
Next up, we've got the Hammer-On and Pull-Off Exercise. This one's great for building strength and speed. Start on the first fret of the low E string, and hammer-on to the second fret. Then, pull-off back to the first fret. Move up a fret and repeat, all the way up the neck. 
Finally, let's look at the Four-Fret Stretch Exercise. This one's a bit of a challenge, but it's great for increasing your reach. Start on the first fret of the low E string with your index finger, then stretch your pinky to the fourth fret. Try to keep all your fingers down while you do this. Then, move up a string and repeat. 
Remember, folks, the key to these exercises is consistency. Do them every day, and you'll see improvements in your finger dexterity in no time. And that's gonna make mastering that B chord a whole lot easier. Keep on rockin'!
Using the B Chord in Different Musical Styles
Now that we've got a firm grip on the B chord, it's time to explore how this versatile chord can be used in various musical styles. Whether you're strumming a folksy tune or shredding a rock anthem, the B chord can add depth and complexity to your sound.
Let's start with the blues, my personal favorite. The B chord can be used to create a moody, soulful sound that's characteristic of this genre. Try playing a 12-bar blues progression in the key of E, and you'll find that the B7 chord fits in perfectly as the 'turnaround' chord. 
Moving on to rock music, the B power chord, also known as B5, is a staple. It's used in countless rock songs due to its strong, punchy sound. To get a feel for it, try playing the main riff of AC/DC's 'Back in Black' - it's a classic example of the B5 in action. 
For those of you into country music, the B chord often appears in a I-IV-V progression. This is a common chord sequence in country and folk music, and mastering it can open up a whole new world of songs for you to play. 
Lastly, let's not forget about pop music. The B chord is often used in catchy pop progressions, adding a touch of sophistication to simple melodies. Try playing a I-V-vi-IV progression in the key of E, and you'll see how the B chord can bring a pop song to life. 
So there you have it, folks. The B chord is a powerful tool in your guitar arsenal, capable of transforming your sound across a range of musical styles. Keep practicing, keep exploring, and most importantly, keep rocking!
Expanding Your Chord Vocabulary
Alright, my fellow guitar enthusiasts, let's dive into the next chapter of our journey - Expanding Your Chord Vocabulary. Now that you've begun to master the B chord, it's time to broaden your horizons. Remember, a guitarist's chord vocabulary is like a painter's palette - the more colors you have, the more vibrant your creations can be.
One of the best ways to expand your chord vocabulary is to learn variations of the chords you already know. For example, if you've got the B major chord down, why not explore the B minor, B7, or Bm7? These chords might sound complex, but they're just variations on a theme. They will not only add variety to your playing but also help you to understand the fretboard better.

Another way to expand your chord vocabulary is to experiment with different chord shapes. The same chord can be played in different positions on the neck, each with its own unique sound. This is a great way to add depth and texture to your playing. For instance, the B chord can be played in the open position, as a barre chord, or using the A shape on the 2nd fret.
Lastly, don't forget to explore other keys. If you're comfortable with the B chord, try transposing your favorite songs into the key of B. This will force you to use the B chord in new contexts, helping you to become more versatile and confident in your playing.
Remember, the journey to mastering guitar chords is a marathon, not a sprint. It's all about steady progress and consistent practice. So pick up that guitar, strum a few chords, and let the music flow. As always, keep those fingers nimble and your spirit high. Happy playing!
Taking Your Guitar Skills to the Next Level
Alright, guitar slingers, now that we've explored the B chord in all its glory, let's shift gears and talk about how to take your guitar skills to the next level. This ain't just about mastering guitar chords, it's about becoming a well-rounded musician. So, buckle up and let's dive right in.
First off, let's talk about improvisation. Improvising is like speaking in your own musical language. It's about expressing your emotions and telling your story through your guitar. The key to improvisation is understanding scales. Scales are like the building blocks of music. They provide the framework for your solos and melodies. So, if you want to improve your improvisation skills, start by learning and practicing scales. 
Next up, rhythm. Rhythm is the heartbeat of music. It's what makes your foot tap and your body sway. To improve your rhythm skills, practice playing along with a metronome. This will help you develop a strong sense of timing and groove. 
Another crucial aspect of guitar playing is ear training. This involves recognizing and identifying sounds. The better your ear, the easier it will be to learn songs, create your own music, and jam with other musicians. Start by trying to figure out simple melodies by ear, then gradually move on to more complex pieces. 
Finally, don't forget about the importance of practice. Practice is the key to mastering any skill, and guitar playing is no exception. But remember, it's not just about quantity, it's about quality. Make sure your practice sessions are focused and productive. Set clear goals, use a practice routine, and always strive for progress, not perfection. 
So there you have it, folks. A roadmap to take your guitar skills to the next level. Remember, the journey of a thousand miles begins with a single step. So pick up that guitar, start strumming, and let the music take you where you want to go. Until next time, keep those strings buzzing and your spirits high. Rock on!
Tips for Mastering the B Chord
Hey there, guitar heroes! Jenny Riff here, ready to share some professional guitar tips to help you master the B chord. So, you've been practicing your finger dexterity exercises, and you're ready to take on the B chord. Great! Let's dive in.
First and foremost, remember that patience is key. Learning a new chord, especially one as tricky as the B chord, takes time. Don't rush it. Practice a little bit every day, and you'll see progress before you know it.
Next, let's talk about finger placement. The B chord is a barre chord, which means you'll need to use your index finger to press down multiple strings at once. This can be challenging at first, but don't worry - it gets easier with practice. Try to keep your index finger as straight as possible, and use the side of your finger rather than the flat part. This will give you a cleaner sound and make it easier to press down all the strings.

Another important tip is to make sure your thumb is in the right place. It should be resting on the back of the guitar neck, providing support for your index finger. If your thumb is too high or too low, it can make it harder to press down the strings and can lead to hand fatigue.

Finally, don't forget to practice transitioning to and from the B chord. This can be one of the most challenging parts of mastering a new chord, but it's also one of the most important. Try practicing transitions between the B chord and other chords you know well, like the A or E chord. This will help you get comfortable with the B chord and improve your overall guitar skills.
Remember, mastering guitar chords is a journey, not a destination. Keep practicing, stay patient, and most importantly, have fun! You're on your way to becoming a B chord pro.
Common Challenges and Solutions
Alright, let's dive into the Common Challenges and Solutions when learning the B chord on the guitar. As you're mastering guitar chords, you might face a few hurdles along the way. But don't worry, every guitarist has been there, and with the right guidance, you'll overcome them in no time.
One of the most common challenges when learning the B chord is getting a clear, ringing sound from each string. This is often due to improper finger placement or not applying enough pressure on the strings. If you're hearing a buzzing sound or muted strings, it's a sign that you need to adjust your fingers. 
Another common issue is finger fatigue. Barre chords like the B chord can be physically demanding, especially for beginners. It's essential to take regular breaks and not push yourself too hard. Remember, it's a marathon, not a sprint. 
Now, let's talk solutions. To get a clear sound, make sure your fingers are pressing down firmly on the strings. If you're struggling with this, try adjusting your thumb position on the back of the neck for better leverage. 
For finger fatigue, regular practice is key. Start with shorter sessions and gradually increase your practice time as your fingers build strength. Also, consider doing some finger exercises to improve your dexterity and stamina. We'll cover this in more detail in the next section, so stay tuned!
Lastly, remember that it's okay to struggle. It's part of the learning process. Keep practicing, stay patient, and before you know it, you'll be playing the B chord with ease. So, keep those fingers nimble, and keep on strumming!


No comments yet. Be the first to share your thoughts!